Testing strategy for used speakers before buying
Bring equipment
- Amp and Source: Absolutely do this. You need to hear the speakers with a real-world signal.
- Cables: Bring your own cables to ensure good connections.
- Multimeter: Useful for checking impedance and continuity.
- Battery (9V or AA/AAA): For a quick “pop” test to check if the voice coil is intact.
- Flashlight: To inspect the physical condition of the speakers.
- Screwdriver: In case you need to remove grills or panels for a closer look.
- Smartphone with RTA App: Apps like AudioTool can help you do a basic frequency response check.
Start with a Visual Inspection
Before even plugging it in, look for physical issues:
- Cone Tears - Also known as the diaphragm, the cone is typically made of paper, plastic, or metal. Even small tears can significantly impact sound quality.
- Surround Deterioration or Tears - This flexible edge, usually made of rubber or foam, allows the cone to move freely while keeping it attached to the basket. Age and environmental factors can cause the surround to become brittle or crack. A barely visible tear in the woofer’s surround can cause air leakage, resulting in the loss of low-frequency response.
- Dented or loose dust cap - The dome in the center of the cone, it prevents dust and debris from entering the voice coil gap. While not always fatal, a severely dented dust cap can affect the speaker’s sound, especially if it’s a tweeter. It can also come unglued and become loose, causing a buzzing or flapping noise.
- Cabinet Integrity - Check for cracks, warping, or loose joints in the speaker enclosure. A compromised cabinet can lead to unwanted resonances and vibrations.
- Loose Cabinet or Baffle: You can gently shake the cabinet or speaker driver. A rattling sound is often caused by a screw coming loose or a joint in the cabinet that has separated over time.
- Basket separation - This rigid frame holds all the components together and provides a mounting point for the speaker. Look for separation of the surround from the basket.
- Poor connections - Loose, corroded, or frayed wires are often the culprits behind intermittent sound issues. Gently wiggle each connection point – any movement could indicate a loose connection that needs addressing. Use a flashlight to inspect the terminals closely. I’ve often found oxidation or debris that’s not visible under normal lighting conditions.
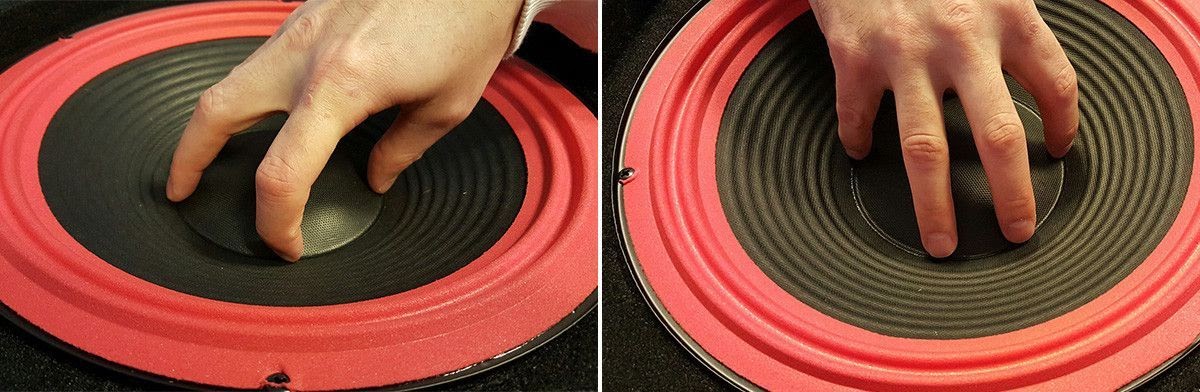
- The “Push Test”: Disconnect the speaker from the mains or amplifier. Lay the speaker on its back. Remove the grill in front of the woofer (this process will differ slightly depending on the speaker type). Spread your fingers over the woofer as shown in this image. Gently press the woofer or midrange cone about an inch and then release. Feel for any scraping or resistance. A smooth, consistent resistance indicates a healthy voice coil alignment. If you hear a scraping or scratching sound: this normally indicates the voice coil is rubbing against the magnet due to it having melted out of shape, and tells you the speaker is blown. For tweeters, this isn’t possible due to their size and design, but it’s generally very obvious if a tweeter has failed or is damaged just by the sound it’s producing.
- Flex Test: Gently press around the edge of the cone, feeling for any areas of uneven resistance. The surround should provide uniform flexibility all the way around. Any stiff or overly soft spots could indicate degradation or damage.
Keep in mind these other physical issues that can affect speaker performance, although they may not be immediately visible:
- Spider Fatigue - This corrugated disc keeps the voice coil centered and provides a restoring force to the cone’s motion. Over time, the spider can lose its elasticity, affecting the speaker’s performance.
- Voice Coil Damage - Overheating or physical damage can cause distortion or complete failure in the tightly wound coil of wire attached to the speaker cone.
- Magnet Demagnetization - A permanent magnet creates a static magnetic field, interacting with the voice coil to produce movement. Demagnetization is rare, but possible, especially in older speakers exposed to strong magnetic fields.
Electrical Tests
Resistance test: Disconnect all wires from the speaker. Set the multimeter to its lowest resistance range. Touch the probes together – you should see a reading close to 0 ohms. Now, touch the probes to each end of a speaker wire. A good wire should show very low resistance, typically less than 1 ohm. When measuring the speaker itself, start with a range that includes 4, 6, or 8 ohms. Connect the multimeter probes to the speaker terminals. A healthy speaker will show a resistance close to its nominal impedance, but usually slightly lower. For instance, an 8-ohm speaker might measure around 6 to 7 ohms. Significantly lower indicates a possible short in the voice coil, while significantly higher suggests an open circuit, possibly a broken voice coil. A fluctuating reading could suggest a loose connection or damaged voice coil.
Battery test: Disconnect the speaker from any audio system. Take a 9-volt battery (or AA and AAA for small speakers and tweeters) and two short pieces of wire. Connect one wire to the positive terminal of the battery and touch it to the positive terminal of the speaker. Briefly touch the other wire between the negative battery terminal and the speaker’s negative terminal. When you make this connection, you should hear a clear ‘pop’ or ‘thump’ sound. This noise indicates that the speaker’s voice coil is moving, which is a good sign of basic functionality. Never connect a battery to a speaker for more than a second or two to avoid potential damage. Prolonged direct current can damage the speaker’s voice coil. If you hear the pop, it indicates that the voice coil is intact and moving. It’s a positive sign, but not a guarantee that the speaker is functioning perfectly. If you hear no sound, or if you hear a scratching noise, it’s time for further investigation.
Impedance: Use a specialized impedance meter + oscilloscope or a multimeter with a frequency generator. Sweep through frequencies while measuring the speaker’s resistance. The resulting curve can reveal a lot about a speaker. Peaks in the curve often correspond to resonant frequencies of the driver. Dips can indicate potential crossover points in multi-driver speakers. Unusual fluctuations might suggest problems with the speaker’s components.
Listening Tests
-
Check Each Driver Individually (if possible): If the speakers have bi-amp or tri-amp terminals, you can test each driver on its own. If not, you can carefully connect your amp to one driver at a time, bypassing the passive crossover. This is a bit advanced but would give you a direct test of the driver without the crossover’s influence.
- Signal Generator Tests: Play a frequency sweep, sine waves at various frequencies (20Hz to 20kHz), and pink noise. Listen for any distortion, rattling, or other anomalies at specific frequencies.
- Sudden dips or cancellations in the sound: These could indicate phase misalignment between drivers.
- Buzzing: A buzzing sound often indicates something loose within the speaker enclosure. Gently tap around the cabinet while playing music to locate the source. It could be anything from a loose screw to a poorly secured internal component.
- Rattling: Rattling usually points to a damaged driver. Carefully inspect the cone, dust cap, and surround for any visible damage. Sometimes, foreign objects can find their way into the speaker, causing rattles – I once found a penny lodged behind a woofer, causing a mysterious rattle at certain frequencies!
- Humming: A persistent hum often suggests an electrical issue. Check for ground loops in your audio setup, and ensure all components are properly grounded. Sometimes, moving speakers away from sources of electromagnetic interference (like power cables or transformers) can eliminate hum.
- Port Noise (Chuffing): A “chuffing” or “huffing” sound coming from the bass port on the back of the speaker, especially during loud bass passages. This is caused by air turbulence as it’s being pushed through a port that is too small for the amount of air being moved.
- Frequency Response and Distortion Measurements: Use a signal generator plus RTA Apps like AudioTool or REW with a good microphone to measure THD. Total Harmonic Distortion (THD) should be as low as possible, especially at typical listening levels. However, remember that some types of distortion can be pleasing to the ear, particularly with certain music genres. Look for a relatively flat response across the audible spectrum, with any intentional deviations (like a slight bass boost) noted by the manufacturer. What you’re looking for are smooth transitions. Uneven frequency response can make music sound unnatural. Look for any significant peaks or dips that don’t align with the speaker’s intended response curve. These are physical issues with the speaker box itself. Resonances are vibrations in the cabinet walls that add unwanted sound, and diffraction is the sound wave bending around the edges of the cabinet, creating frequency response irregularities. If a driver inherently has a high level of harmonic or intermodulation distortion, DSP can’t reduce it.
- Off-Axis Response (Directivity): Measure how the speaker distributes sound into the room. A woofer or tweeter might have a very narrow or uneven dispersion pattern. This can affect how the speaker interacts with the room and how it sounds from different listening positions. Measure at various angles (0°, 15°, 30°, 45°, etc.) from the front of the speaker. Look for a smooth roll-off in response as you move off-axis, indicating good dispersion characteristics.
-
Music: Select a variety of music you know well with a wide dynamic range. I always include some acoustic recordings for assessing naturalness, electronic tracks for testing deep bass response and dynamics, and complex orchestral pieces to evaluate soundstage and imaging. This will give you a sense of the overall sound quality and allow you to listen for intermittent issues that RTA testing might miss. Listen for ‘muddiness’ or ‘harshness’ in the sound, which often indicate distortion. Does the bass, midrange, and treble sound well-integrated? Can you pinpoint the location of instruments in space? Can you hear subtle nuances in the music? How well does the speaker handle both quiet and loud passages? It may seem odd to evaluate these aspects for the speaker in isolation, without considering the room acoustics or other speakers, but a well-designed speaker should still perform admirably in a variety of environments.
- Sound Pressure Level (SPL), Sensitivity, and Power handling: Use a calibrated SPL meter or a professional microphone with appropriate software. Measure in an anechoic chamber for absolute accuracy, or in a well-treated room for relative measurements. Take measurements at a consistent distance, typically 1 meter from the speaker. Use a variety of music, pink noise, frequency sweeps, and test tones. Start at low volumes and gradually increase. Monitor for signs of distress: audible distortion, mechanical noises, or excessive heat from the voice coil. You can measure maximum output capabilities and consistency across different frequencies. Never exceed the manufacturer’s stated maximum power rating. Remember, continuous power handling is usually much lower than peak power handling. Pushing too hard or fast can end up with a melted voice coil.